If you’re considering a water softener for your home, understanding pre-plumbing is essential for a smooth installation. Proper pre-plumbing ensures that your water softener connects seamlessly to your existing plumbing system, making the process much simpler. Many homes, especially in areas like Orange County, are constructed with pre-plumbing specifically for water softeners, allowing for efficient setups and minimizing complications during installation.
Before diving into the installation process, it’s crucial to verify that your home has the necessary plumbing infrastructure. This involves checking for adequate space and ensuring compatibility with your current system. Partnering with professionals like Splash Plumbing can ensure that your pre-plumming needs are met efficiently and effectively, giving you peace of mind as you enhance your water quality.
As you move forward, knowing how to prepare for the installation will help you avoid unnecessary delays and costs. By addressing pre-plumbing beforehand, you’ll set the stage for a successful water softener installation that will benefit your home for years to come.
Understanding Pre Plumbing for Water Softener
Pre-plumbing for a water softener ensures that your home’s plumbing system is ready for an efficient installation. This setup simplifies the process and can enhance water quality. Here are essential details about pre-plumbing and its functionality with various plumbing systems.
What Is Pre-Plumbing?
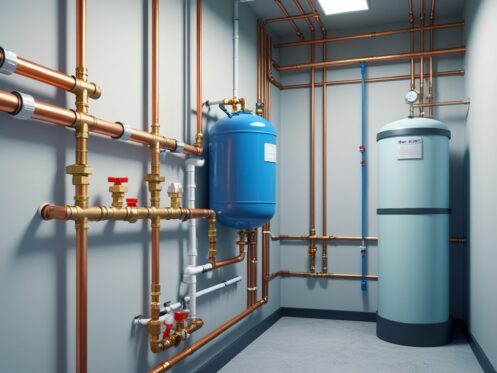
Pre-plumbing refers to the installation of necessary pipes, fittings, and components prior to the actual installation of a water softener. This process creates a dedicated water line and drainage system for the softener, allowing for seamless integration. Key components often include a bypass valve, which allows you to switch between softened and hard water without disrupting the overall system.
Houses designed with pre-plumbed systems have pipes routed specifically for water softeners, reducing the need for extensive modifications during installation. This proactive approach saves time and minimizes installation costs. For those considering a water softener, pre-plumbing makes the process straightforward and less intrusive.
How Pre-Plumbing Works with Different Plumbing Systems
Pre-plumbing is adaptable to various plumbing systems, whether traditional or more modern designs. In most cases, the primary line feeding the home is equipped with the necessary connections for a water softener.
Newer homes may feature dedicated ports for these systems, while older homes can also be retrofitted with minimal disruption. The integration typically involves connecting the water softener to the main supply and the drain, ensuring proper flow and discharge.
Splash Plumbing can assist with identifying the best routes and connections for your specific plumbing setup, ensuring optimal performance from your water softener.
Benefits of Pre-Plumbed Water Softeners
The benefits of opting for a pre-plumbed water softener are significant. Firstly, the installation time is considerably reduced, allowing for quicker access to softened water. You can avoid the hassle of major plumbing renovations, reducing both time and costs.
Additionally, having a pre-plumbed system can lead to improved water quality and efficiency. Softened water can enhance the lifespan of your appliances and reduce mineral buildup in pipes.
With Splash Plumbing’s expertise, your water softener can seamlessly integrate into your home, providing lasting benefits and elevated water quality right from the start.
Key Components of a Pre-Plumbed Water Softener Setup
Understanding the essential components of a pre-plumbed water softener setup is crucial for efficient installation and optimal performance. Focus on the following elements to ensure your system operates smoothly.
Water Softener Loop
The water softener loop is a critical part of the installation. It consists of a dedicated pipe that connects the cold water supply to the water softener and then back to your plumbing system. This loop allows softened water to be distributed throughout your home.
When assessing the installation, ensure that the loop is installed correctly with proper fittings, including compression fittings and elbow fittings to navigate existing plumbing. A well-placed loop will help prevent leaks and make future maintenance easier. Always consult with qualified professionals for optimal placement in your home’s plumbing for efficient performance.
Bypass Valve and Shut-Off Valves
A bypass valve is vital for regulating water flow to the water softener. This component allows you to divert water around the system during maintenance or servicing without affecting your household’s operation. Make sure the bypass valve is easily accessible for convenience.
Shut-off valves also play an essential role; they control the water flow to the softener entirely. Always install these valves in close proximity to the water softener for easy access. Proper positioning ensures you can isolate the system when needed, simplifying any repairs or inspections.
Plumbing Connections and Fittings
Proper plumbing connections are essential for a well-functioning water softener. You’ll need to use appropriate fittings and connectors, such as compression fittings, to attach the unit securely to your existing plumbing.
Elbow fittings can be particularly useful in navigating tight spaces. Ensure all connections are leak-proof to prevent water damage. Identifying potential pressure points in the plumbing system can help address any issues before they arise. Always opt for high-quality materials to enhance durability and efficiency.
Drain Hose and Tubing
The drain hose and tubing are crucial for directing wastewater away from the water softener’s brine tank during regeneration. The drain line should be installed in a way that prevents backflow and allows for smooth drainage.
Choose tubing that meets local codes; generally, 3/4-inch diameter tubing is suitable. Installing an overflow tube can also prevent spills or leaks. Connect the drain hose securely to avoid disconnection during operation; this ensures proper waste disposal and maintains the integrity of your system.
For any assistance with your installation, consider contacting Splash Plumbing. Their expertise can guide you through these essential components, ensuring your water softener setup is efficient and reliable.
Step-by-Step Pre Plumbing Process
Pre plumbing a water softener involves careful planning and execution to ensure a seamless installation. This process simplifies connecting the water softener to your plumbing system, making it easier to enjoy the benefits of softened water.
Selecting the Installation Point
Choosing the right location for your water softener is crucial. Look for an area close to your main water line and ensure there is sufficient space for the unit itself. Ideal spots include basements, utility rooms, or garages, as these areas typically allow for easy access to the water supply.
Consider the direction of water flow and ease of drainage when selecting the installation point. A hindered location can complicate your plumbing work. Make sure the area complies with local codes and is accessible for future maintenance. Additionally, be mindful of noise levels, placing the unit away from living areas when possible.
Preparing the Water Supply Line
Before connecting your water softener, you need to prepare your water supply line. First, shut off the main water supply to prevent any leaks. Use a pipe cutter to remove a section of the water supply line where the softener will be installed.
After cutting the pipe, deburr the edges to ensure a smooth fit. If soldering is needed, remember to clean the copper pipe thoroughly to achieve a solid bond. It’s crucial to install a bypass valve to allow maintenance on the softener without disrupting your water service. Ensure all components fit securely to avoid leaks once the system is active.
Connecting the Main Water Line
Once your water supply line is ready, it’s time to connect it to the main water line. Begin by aligning the softener’s inlet and outlet connections with the prepped water line. Use appropriate fittings to secure the connection, ensuring no gaps remain.
It’s important to follow the manufacturer’s instructions for specific installation details. If soldering, take care to let the connections cool before restoring the water supply. Once everything is securely connected, turn the main water line back on and check for any leaks. This step is vital for the reliability of your water softener system.
Looking for a plumber near Anaheim, CA? Splash Plumbing is a top-rated plumbing company ready to assist you with your water softener installation.
Home Installation Considerations
When installing a water softener, several critical factors must be taken into account to ensure optimal performance. Key considerations include space availability in your home, the plumbing setup for installation, and how the new system interacts with your existing water heater.
Basement Installation Strategies
Basements can be an ideal location for water softener installation due to space efficiency and accessibility. Ensure that the area is dry and free from any potential flooding risks. It’s essential to install the softener near the main water line for effective operation. Adequate space around the unit is necessary for regular maintenance.
Consider the accessibility of electric outlets and drainage options, as these will be crucial for the softener’s operation. Ensure that there is no obstruction, allowing easy access for maintenance tasks. If installing in a basement, consider the potential temperature fluctuations during winter. Maintaining a stable environment will help prolong the equipment’s lifespan.
Plumbing Requirements for DIY Installation
If you decide on a DIY installation, understanding your plumbing system is vital. Ensure you have the right tools, including wrenches, tubing cutters, and Teflon tape, to complete the job effectively. Many systems require adequate drainage and a bypass valve.
Before starting, review the local plumbing codes, as they may dictate specific installation requirements. You must check connections and fittings for leaks after installation. If you encounter difficulties or uncertainties, it may be worth consulting with professionals like Splash Plumbing, who can provide expert assistance.
Influence on Water Heater and Electric Water Heating
Installing a water softener can affect your existing water heater’s efficiency. Hard water can lead to mineral buildup, reducing the heater’s efficiency and lifespan. By softening the water, you can help extend the life of your heater and improve its performance.
It’s important to check the compatibility of your water softener with the type of water heater you have, particularly if it’s an electric model. Ensure that the softened water meets the manufacturer’s specifications for optimum performance. This step can lead to cost savings on maintenance and energy bills over time, making it a smart investment for your home.
Maximizing Water Softener Efficiency
To ensure your water softener functions optimally, it’s crucial to address specific factors that influence its performance. Understanding water quality, the impact on water pressure, and the benefits of soft water will help you achieve the best results.
Water Quality and Hardness Factors
Water hardness is primarily due to minerals like calcium and magnesium. These elements lead to scale buildup, affecting appliances and plumbing efficiency. When installing a water softener, testing your water quality is essential.
By knowing the hardness level, you can select a system that meets your needs. The regeneration process of your softener also relies on water quality; higher hardness levels may require more frequent regeneration cycles, impacting salt usage.
Consider using a pre-plumbed water softener installation for optimal integration with your plumbing system. A company like Splash Plumbing can provide guidance to ensure you are making the right choice for your home.
Impact on Water Pressure
The efficiency of your water softener can also affect your home’s water pressure. When water flows through a softener, it undergoes ion exchange, replacing hardness minerals with sodium or potassium ions. This process can create slight pressure fluctuations, especially if the system is not correctly sized.
Installing a bypass valve can help manage water pressure, allowing you to divert water during high demand or maintenance. Ensuring the softener is matched to your household’s water needs is vital. Inadequate sizing can lead to inefficient performance, causing reduced water pressure and increased wear on the system.
Soft Water Benefits for Your Home
Using soft water offers numerous advantages. It reduces scale buildup in pipes and appliances, helping to prolong their life. You’ll notice improvements in cleaning, as soap lathers better, leading to less soap scum and cleaner surfaces.
Soft water is also gentler on skin and hair, making bathing more pleasant. Furthermore, you may experience lower energy bills, as soft water requires less energy for heating. If you’re considering water softener installation, let Splash Plumbing assist you. Their expertise can help you enjoy these benefits swiftly and efficiently.
Professional Tips and Ongoing Maintenance
Maintaining your water softener is crucial for optimal performance and longevity. Understanding when to hire a professional plumber, what routine maintenance entails for a pre-plumbed setup, and how to extend the life of your system will help you ensure consistent water quality.
When to Hire a Professional Plumber
You should consider hiring a professional plumber when you notice signs of malfunction or inefficiency in your water softener system. Common indicators include unusual noises, reduced water softness, or a salty taste in your water. If you’re unsure about installation or maintenance, a qualified plumber can prevent costly mistakes.
Regular inspections are also vital. A professional can easily identify potential issues before they escalate. If you reside near Anaheim, CA, companies like Splash Plumbing offer expert services for water softener installations and maintenance to ensure optimal functionality.
Routine Maintenance for Pre-Plumbed Setups
For pre-plumbed water softener setups, routine maintenance is essential to uphold performance. Start by checking the salt levels monthly; replenish them as needed. Clean the brine tank periodically to avoid salt bridges, which can disrupt operations.
Inspect the filter and resin bed every six months, replacing components as necessary. Flushing the system can also help remove buildup and debris. Keeping a maintenance schedule helps ensure your unit performs effectively. Don’t hesitate to contact a plumbing professional for these tasks, as they can carry out comprehensive checks to address complex issues that might arise.
Extending the Life of Your System
To extend the lifespan of your water softener, consider implementing best practices during operation. Start by maintaining optimal water pressure to avoid stressing the unit. Limit the use of harsh chemical cleaners that can damage your plumbing.
Regularly monitor your water quality to detect changes. If it becomes hard or discolored, consult with experts to diagnose and correct the issue. Investing in preventative maintenance from reputable plumbers, such as Splash Plumbing, contributes significantly to a longer-lasting and efficient water filtration system. These steps will ensure that you derive maximum benefit from your installation over the long term.
Frequently Asked Questions
When considering a water softener installation, you may have various questions about the plumbing involved. Here are some specific inquiries that will aid you in understanding the installation process and components associated with water softeners.
How do I read and understand a water softener plumbing diagram?
Reading a water softener plumbing diagram involves understanding the flow of water through various components. Typically, you’ll see symbols representing the water softener, valves, and connections to your plumbing system. Each line indicates where water enters and exits, allowing you to visualize the installation layout.
What components are included in a typical water softener drain kit?
A typical water softener drain kit usually includes a drain hose, a connector, and sometimes a trap for preventing sewer gas. The drain hose directs wastewater from the softener to your drainage system, ensuring proper functionality during regeneration cycles.
What are the different water softener drain options available?
Water softeners have several drain options. Common choices include connecting to a household drain, installing a dedicated drain line, or utilizing a floor drain. Each option has specific installation requirements and should comply with local plumbing codes.
Can you explain the steps for water softener drain installation?
Installing a water softener drain involves a series of steps. First, identify the location for the drain. Next, cut the drain hose to the appropriate length and attach it to the softener. Then, secure the other end to your chosen drainage system, ensuring it is secure to prevent leaks.
What is a water softener loop with 3 pipes, and how does it function?
A water softener loop with three pipes typically includes an inlet, outlet, and a drain line. This setup allows for continuous water flow during the softening process and facilitates the drainage of wastewater during regeneration. Each pipe plays a crucial role in the efficiency of the system.
How much can I expect to pay for water softener loop installation?
The cost for installing a water softener loop varies based on several factors, including your location and the complexity of the installation. You can expect to pay anywhere from $300 to $800, depending on material and labor costs. For specific estimates, consult a professional plumber, such as Splash Plumbing, who can assess your needs accurately.

