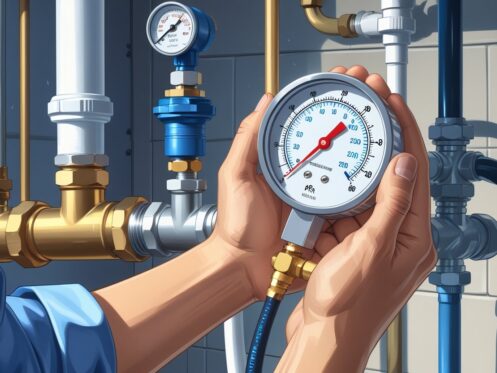
Knowing your home’s water pressure is key to maintaining a functional plumbing system. To test your water pressure, you simply need a pressure gauge attached to an outdoor hose bib or a utility faucet near your main water supply. Make sure no water is running inside your house during the test for an accurate reading.
If your water pressure is too low, you might notice weak shower flow or slow-filling appliances. High pressure, on the other hand, can damage pipes and fixtures over time. Learning how to measure and adjust it can prevent costly repairs down the line.
At Splash Plumbing, we’ve helped many homeowners in Anaheim, CA assess and manage their water pressure to avoid these problems. Taking a few minutes to test your water pressure can save you time and money while keeping your system running smoothly. For detailed steps on how to test your water pressure at home, read on.
Understanding Water Pressure
Water pressure plays a key role in how effectively your plumbing system functions. It affects everything from shower strength to how quickly your appliances fill. Knowing the basics can help you maintain proper flow and avoid damage.
What Is Water Pressure and How Is It Measured
Water pressure is the force water exerts within your pipes, measured in pounds per square inch (psi). It indicates how strongly water moves through your plumbing system. Pressure gauges attach easily to hose bibs or faucets to give you an accurate reading.
Typically, water pressure in homes depends on your municipal supply or private well system. If your pressure is too low, water flow slows and appliances underperform. If too high, pipes and fixtures risk damage from excess force. Measuring with a gauge is the most reliable way to assess pressure.
Ideal Residential Water Pressure Ranges
Your home’s optimal water pressure usually ranges between 40 to 60 psi. Below 40 psi, water flows weakly, affecting showers and filling times. Above 80 psi, pipes may wear prematurely or cause leaks.
Most plumbing codes recommend keeping pressure within this range to protect your system and ensure comfort. Pressure regulators are commonly installed if municipal supply pressure exceeds the ideal range, stabilizing flow inside your home.
You can check pressure yourself using an inexpensive gauge. Splash Plumbing recommends testing pressure twice a year, especially if you notice changes in water flow or appliance efficiency.
Why Water Pressure Matters in Your Home
Water pressure impacts daily living directly. Low pressure may result in weak showers, slow toilet refills, and inefficient water heaters. High pressure can cause noisy pipes, dripping faucets, or burst supply lines.
Maintaining correct pressure enhances your plumbing’s lifespan and reduces repair costs. It also helps appliances like dishwashers and washing machines to function correctly. If you experience persistent pressure problems, it’s wise to consult a professional plumber.
For residents near Anaheim, CA, Splash Plumbing offers expert assessment and repair services to keep your home’s water pressure in optimal condition. Proper pressure helps preserve your entire plumbing system’s health and your comfort.
Preparation for Testing Water Pressure
Before testing water pressure, you need to identify key locations in your plumbing system and make sure conditions are ideal for an accurate reading. This involves locating critical valves and selecting the right faucet or hose bib while ensuring all water fixtures in your home are off.
Locating the Main Water Supply and Shut-Off Valve
Start by finding your home’s main water supply line, often near the water meter or where the water pipe enters your property. This valve controls the entire water flow to your house and is essential if you need to stop water during testing or repairs.
The shut-off valve could be a gate valve or ball valve, usually made of brass or steel. Confirm that it operates smoothly to avoid unexpected leaks or issues. Knowing its location beforehand can save you time and prevent damage during pressure testing.
If you have trouble locating the main shut-off valve, check near your water heater, basement, or crawl space. You may want to consult a professional plumber like those at Splash Plumbing for help.
Choosing the Right Faucet or Hose Bib
For the most accurate water pressure reading, connect your pressure gauge to an exterior hose bib or an indoor fixture close to the main supply. Outdoor hose bibs are preferred because they often have fewer restrictions and better represent overall system pressure.
Avoid using faucets with built-in pressure regulators or those with aerators, as they can skew results. Washer hookups or utility sinks are good alternatives if outside access is limited.
Make sure the chosen faucet or hose bib has a compatible thread size for your pressure gauge to ensure a tight, leak-free connection during the test.
Ensuring All Water Fixtures and Appliances Are Off
Before testing, turn off all faucets, showers, and water-using appliances like dishwashers, washing machines, and irrigation systems. Running water will affect your pressure reading by causing fluctuations.
Check toilets and other fixtures for running leaks and confirm they are fully closed. This step helps create a stable system pressure and prevents false low or high readings.
If you detect any unwanted water flow during this prep stage, address it or inform your plumber before testing to ensure accurate diagnostics and avoid misinterpretation of your home’s water pressure.
How to Test Water Pressure in Your House
Measuring your home’s water pressure is straightforward and requires only a few tools or methods. You will learn how to correctly use a pressure gauge, alternative ways to check water pressure without specialized tools, and how to understand the results to ensure your water flow is within the proper range.
Using a Pressure Gauge Step-by-Step
First, obtain a water pressure gauge designed for plumbing systems. These attach easily to an outdoor faucet or a washing machine valve.
- Turn off all water-using appliances inside your house.
- Screw the pressure gauge onto the faucet or valve tightly.
- Fully open the faucet to allow water to flow into the gauge.
- Read the pressure on the gauge dial in psi (pounds per square inch). Ideal home water pressure typically ranges between 40 and 60 psi.
- Close the faucet and remove the gauge.
Using this method gives you an accurate, immediate measurement of your water pressure. A pressure gauge is inexpensive and reusable, making it a reliable tool for regular testing.
Alternative Methods Without a Pressure Gauge
If you don’t have a pressure gauge, observe signs of water pressure issues during use. For example, if multiple faucets run with weak water flow or your shower pressure feels low, this indicates pressure is below the recommended 40 psi.
You can also use a bucket test: time how long it takes to fill a 1-gallon bucket from a faucet on full flow. If it takes longer than 15 seconds, your water pressure may be insufficient. While less precise, these methods help you identify if water pressure is abnormal before contacting a professional.
Interpreting Pressure Gauge Results
Once you measure water pressure:
| Pressure Level | Effect on Home Plumbing |
|---|---|
| Below 40 psi | Poor flow, weak showers, slow filling tanks |
| 40 to 60 psi | Optimal range for efficiency and comfort |
| Above 60 psi | Risk of pipe damage, leaks, and appliance strain |
If pressure is too low, you may need to adjust pressure regulators or consult a plumber. If it’s too high, a pressure-reducing valve could protect your system.
For accurate testing and adjustment, trusted plumbing services like Splash Plumbing can assist in the Anaheim area to keep your home’s water pressure within safe limits.
Troubleshooting Low and High Water Pressure
Water pressure problems stem from various causes that affect flow and system integrity. These issues can lead to noticeable changes in how your faucets, appliances, and pipes perform. Understanding what to look for can help you quickly identify whether you have low or high water pressure and what to do next.
Common Causes of Low Water Pressure
Low water pressure often results from partially closed valves, clogged aerators, or buildup inside pipes. Sediment and mineral deposits can restrict flow, especially in older homes with galvanized pipes. Leaky pipes also reduce pressure by wasting water before it reaches your fixtures.
Another frequent cause is issues with your water supply, such as municipal pressure being too low or problems with your pressure regulator. Sometimes, a water main break in your area or maintenance work can temporarily reduce pressure.
To check for low pressure, test multiple faucets. If it’s consistent throughout your home, the problem likely lies before your plumbing system, like the main shutoff valve or pressure regulator. Cleaning faucet aerators or contacting a professional plumber, such as Splash Plumbing, can resolve many of these problems.
Identifying Signs of High Water Pressure
High water pressure can cause water to flow too forcefully from your faucets or showerheads. You might notice banging or loud noises in your pipes, known as water hammer. Consistently high pressure can cause valves and seals to wear faster, leading to leaks.
To diagnose high pressure, use a pressure gauge on an outdoor faucet or laundry tub tap. Pressure above 80 psi is generally too high and may require a pressure-reducing valve adjustment.
You may also see dripping faucets that don’t shut off completely or frequent appliance damage. High pressure strains your plumbing system, so addressing it swiftly prevents costly repairs.
Impacts on Pipes, Faucets, and Appliances
Both low and high water pressure can damage your home’s plumbing. Low pressure causes appliances like washing machines and dishwashers to fill slowly, reducing efficiency and increasing cycle times. Showers become weak, and faucets may only drip.
High pressure is harder on pipe joints and fittings, increasing the risk of leaks and burst pipes. Faucets may drip or fail, and appliances may wear out prematurely due to stress from excessive water flow. Over time, plumbing systems with unstable pressure face greater maintenance issues and higher repair costs.
Monitoring and maintaining correct water pressure preserves plumbing health. If you need assistance, contacting experienced plumbers like Splash Plumbing near Anaheim, CA, ensures proper diagnosis and lasting solutions.
To learn more about testing water pressure, see this comprehensive guide to testing water pressure.
Next Steps and Professional Solutions
Once you’ve tested your water pressure, understanding the appropriate next steps is crucial. You may need professional help if issues persist, or you might consider equipment adjustments or installations to stabilize your system for consistent performance.
When to Call a Plumber
If your test results show persistently low or high pressure that you cannot explain, it’s time to call a professional plumber. Problems such as hidden leaks, faulty valves, or issues within your pipes require specialized tools and expertise to diagnose and fix. Attempting repairs without proper knowledge may worsen the issue or cause damage.
A licensed plumber from Splash Plumbing can conduct a thorough inspection of your system, including underground pipes. They can quickly identify the root cause and recommend targeted repairs or replacements. Early professional intervention prevents costly damage and helps maintain water flow reliability in your home.
Installing or Adjusting a Pressure Regulator
A pressure regulator keeps your water pressure within a safe, efficient range, usually between 40 and 60 PSI. If your test shows pressure outside this range, adjusting or installing a pressure regulator may be necessary. High pressure can stress plumbing fixtures, causing leaks or bursts, while low pressure reduces water flow.
You can request your plumber to assess the current pressure regulator for proper function. If it’s faulty or missing, installing a regulator can balance water pressure and protect your plumbing. Regular adjustments ensure your system runs smoothly without unnecessary wear and tear on pipes or appliances.
Using a Pressure Tank for Improved Performance
A pressure tank stores water under pressure, helping maintain steady water flow and reducing pump cycling in homes with well systems or variable municipal supply. If you experience frequent pressure fluctuations, installing a pressure tank can stabilize output and extend pump life.
Pressure tanks also reduce water hammering and prevent pressure spikes that can damage plumbing components. Your plumber can help determine if a pressure tank is needed based on your water system type and pressure patterns. Proper setup and maintenance of the tank will optimize your home’s water pressure performance over time.
Frequently Asked Questions
Knowing how to measure and adjust water pressure helps protect your plumbing and improve water flow. Proper tools and clear steps can guide you in testing pressure at various fixtures and during inspections.
What are the steps to adjust water pressure in your home?
Begin by locating your main water shutoff valve and pressure regulator, usually near your water meter. Use a pressure gauge to check the current pressure. Adjust the pressure regulator screw clockwise to increase pressure or counterclockwise to decrease it. If pressure is too high or low, consider installing or replacing a pressure-reducing valve.
How can you check your shower’s water pressure?
Attach a pressure gauge to the shower hose or an outdoor hose bib close to the water source. Turn the shower on fully and read the gauge. Low readings may indicate clogged aerators or plumbing issues, while high pressure can cause fixture damage.
What is the recommended water pressure for a two-story house?
The ideal water pressure typically ranges from 40 to 60 psi. For two-story homes, maintaining pressure near 50 psi ensures adequate flow on both floors without stressing pipes or fixtures.
How do you perform a water pressure test during a home inspection?
Connect a pressure gauge to an outdoor faucet or hose bib near your main supply line. Open the tap fully and record the pressure. Repeat at different times to check consistency. Document any readings above 80 psi or below 40 psi, as these may signal plumbing problems.
What should you do if your home water pressure reads 100 psi?
A reading of 100 psi is too high and can damage your plumbing system. Immediately reduce pressure by adjusting or installing a pressure-reducing valve. If unsure, contact a professional plumber like Splash Plumbing for a thorough evaluation and safe adjustment.
How to use a home water pressure gauge effectively?
Attach the gauge securely to an outdoor hose bib or faucet near your water main. Open the valve fully and wait for the needle to stabilize before reading. Repeat the test in different locations to get accurate and consistent measurements. Regular testing helps maintain optimal water pressure and prevent costly issues.

