When it comes to refreshing your bathroom, knowing how to plumb a shower is essential for a successful renovation or installation. By mastering the plumbing process, you can ensure that your shower operates efficiently while adding value to your home. With the right tools and a clear plan, this project can be tackled by homeowners with a bit of DIY spirit.
Before diving into the specifics, it’s important to understand the key components involved in shower plumbing. You will need to handle water supply lines, drainage systems, and various fixtures. Utilizing the expertise of professionals, like those at Splash Plumbing, can make this task even easier, ensuring your installation meets local codes and standards.
As you read on, you will discover step-by-step instructions tailored for both beginners and those with some experience. Whether you’re looking to install a brand new shower or replace an old unit, this guide will equip you with the knowledge to achieve a successful outcome.
Planning Your Shower Plumbing Project
Before you start your shower plumbing project, it’s essential to have a solid plan. This involves assessing your existing plumbing, understanding local codes, and selecting appropriate fixtures. Taking these steps will ensure a smooth installation process and compliance with regulations.
Assessing Your Existing Bathroom Plumbing
Start by examining your current shower plumbing layout. Look for existing pipes, valves, and any drain configurations. Identify the type of water supply lines you have, such as copper, PEX, or PVC. Knowing this will help you determine what materials you can use for the new installation.
Also, check for any water leakage or corrosion around joints and fixtures. This assessment will allow you to make necessary repairs before starting your project. If you feel uncertain about any aspects, consulting a professional like Splash Plumbing can provide further guidance.
Understanding Plumbing Codes and Diagrams
Familiarize yourself with local plumbing codes before you begin. This documentation outlines requirements for shower installations, including fixture spacing and drain sizes. Most codes require specific clearances to ensure safety and functionality.
Review plumbing diagrams to visualize your planned layout. These diagrams help you understand where each component will go, ensuring that everything aligns with your plumbing system. Proper planning according to these codes not only guarantees compliance but also aids in avoiding costly mistakes.
Selecting the Right Plumbing Fixtures
Choosing the right plumbing fixtures is crucial for both functionality and style. Consider factors like size, water flow rate, and compatibility with existing plumbing. Popular options for shower fixtures include thermostatic valves and pressure-balanced valves, which enhance user comfort and safety.
Also, think about the aesthetics of your bathroom. Fixtures come in various styles and finishes, allowing you to match them with your decor. Ensure that any selected fixtures meet plumbing standards to avoid issues during installation. For assistance in selecting fixtures that suit your needs, contact Splash Plumbing for expert advice.
Preparing for Shower Installation
Before starting your shower installation, it’s crucial to prepare adequately. Proper preparations will ensure a smooth installation process and help you avoid common pitfalls. Focus on gathering the right tools and materials, ensuring the water supply is safely shut off, and accurately marking the pipe runs.
Gathering Tools, Materials, and Replacement Parts
Begin by collecting all necessary tools and materials. Key tools include:
- Pipe wrenches
- Adjustable pliers
- Drill and bits
- Level
- Measuring tape
For materials, you’ll need plumbing pipes (such as plastic pipe), fittings, and fixtures. Replacement parts should be ready, including any new shutoff valves or connectors. Familiarize yourself with the required size and type of each component to ensure compatibility. Having everything at hand will minimize interruptions during installation.
Shutting Off Water Supply Safely
Before any plumbing work, shut off the main water supply. Locate the main shutoff valve, usually found near the water meter or where the main line enters your home. Turn the valve clockwise to stop the flow of water.
After shutting off the water, open nearby faucets to relieve pressure in the lines. This helps minimize any potential water spillage and makes the installation process safer. Ensure you have buckets or rags ready to catch any leftover water.
Marking Pipe Runs and Rough-In Dimensions
After ensuring the water is off, accurately mark your pipe runs and rough-in dimensions. Use a measuring tape to determine the exact locations for your plumbing fixtures based on standard bathroom sink rough-in dimensions.
Clearly mark the positions on the wall and floor to guide your installation. Accurate markings will help you avoid misalignments, saving time and resources. Additionally, review any local plumbing codes related to shower installations to ensure compliance.
Taking these steps will set the groundwork for an efficient and successful shower installation. If you need assistance or guidance, consider reaching out to experts like Splash Plumbing for support.
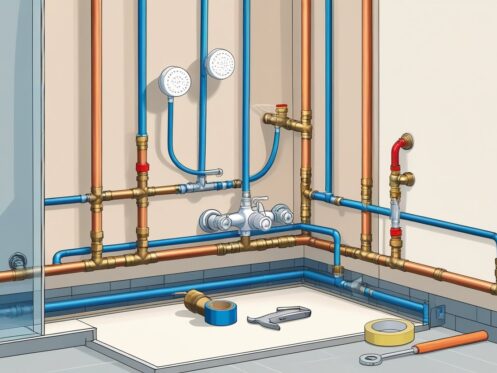
Installing Shower Pipes and Supply Lines
Properly installing shower pipes and supply lines is crucial for ensuring a reliable water flow and avoiding leaks. This process involves running hot and cold water pipes, connecting appropriate materials, and installing shutoff valves. Each step must be executed with precision.
Running Hot and Cold Water Pipes
Start by determining the layout for your water supply pipes. You’ll need hot and cold water lines, which typically consist of copper, PEX, or PVC pipes.
- Measurements: Measure the distance from the water source to the shower. This helps in cutting the pipes to the right lengths.
- Pipe Placement: Run the hot supply line (usually red) from the heater and the cold supply line (usually blue) from the main water line. Ensure pipes are secured with brackets to avoid movement or vibrations.
- Connections: Use appropriate fittings (elbows and tees) to connect pipes while ensuring tight seals for leak prevention. Pay special attention to maintaining proper slopes to encourage drainage and avoid standing water.
For detailed guidance on pipe installations, you can refer to this installation guide.
Connecting PEX and Plastic Pipe
When connecting PEX or plastic pipes, appropriate fittings and methods are essential for an adequate seal.
- Cutting the Pipe: Use a pipe cutter to ensure clean, straight cuts. This helps with better connections.
- Fittings: For PEX, use crimp or clamp fittings. For plastic pipes, solvent cement is recommended to create a strong bond.
- Joinery Methods: Always follow manufacturer instructions when connecting different pipe materials to ensure compatibility.
It’s recommended to check for leaks after all connections are made. Utilize the diagrams available for visual assistance in setting up these lines.
Installing Shutoff Valves and Fittings
Installing shutoff valves is an important step in controlling water supply to the shower.
- Location: Place the shutoff valve near the water source and within easy reach for future maintenance.
- Type of Valve: Use ball valves for reliability. They’re durable and provide a quick shut-off when needed.
- Connections: Ensure they are securely fitted to both the supply line and the riser. Use plumber’s tape on threaded connections to prevent leaks.
Regular maintenance checks on these valves will help avoid future plumbing issues. For a comprehensive guide on the installations and repairs, consider consulting an expert like Splash Plumbing.
Setting Up the Shower Valve, Faucet, and Controls
Setting up the shower valve, faucet, and controls is crucial for a functional and safe shower. A proper installation ensures consistent water flow and comfortable temperatures while offering features like anti-scald protection.
Mounting the Mixing Valve and Diverter Valve
Begin by selecting a suitable location for the mixing valve, typically between the hot and cold water supplies. Secure the valve to the wall studs using screws. The diverter valve can be integrated with the mixing valve or installed separately. Ensure that the diverter handle aligns properly for ease of use. Connect the water supply lines carefully, using Teflon tape on threaded fittings to prevent leaks.
After placing the mixing valve, test the connections for any leaks before moving on. If your setup includes a separate diverter valve, follow the manufacturer’s instructions for precise positioning and attachment. Proper installation of these components ensures efficient water mixing and temperature control.
Installing the Shower Faucet and Trim
Choose a shower faucet that complements your bathroom aesthetics and meets your flow rate requirements. Begin the installation by attaching the faucet to the pre-mounted mixing valve. Use an adjustable wrench to secure the fittings without over-tightening, which can damage the components.
Once the faucet is mounted, install the trim kit according to the manufacturer’s guidelines. This includes attaching the handle, temperature control, and cover plate. Ensure that all parts are aligned and securely fastened. After installation, turn the water supply back on and check for leaks at all connections.
Positioning the Shower Riser and Arm
Next, you will position the shower riser, which connects the faucet to the showerhead. Choose an appropriate height for the riser based on user comfort and average height preferences. The arm should extend away from the wall at a slight angle to avoid water run-off and maximize coverage.
Secure the riser using brackets or straps. Make sure it is level and straight before tightening all connections. Attach the showerhead to the arm, ensuring it is firmly in place. Check the alignment by turning on the water and verifying that the showerhead distributes water evenly.
Configuring Anti-Scald and Thermostatic Protection
To enhance safety, configure any anti-scald features included with your shower system. This often entails adjusting a thermostat within the mixing valve that limits the maximum temperature of the water. Refer to the manufacturer’s instructions for the specific settings that ensure safety.
If your system uses a thermostatic shower cartridge, install it according to the directions. This component maintains consistent water temperature and reduces the risk of sudden temperature changes. After installation, perform a test run to confirm that the anti-scald protection works effectively.
For reliable plumbing solutions, contact Splash Plumbing to ensure your installation adheres to best practices and local codes.
Completing the Shower System Connections
Connecting the various components of your shower system is crucial for optimal performance and functionality. Ensure that you have the right tools and materials on hand as you finish these essential connections.
Attaching the Shower Head, Arm, and Flange
Start by securing the shower arm to the wall fitting using Teflon tape around the threads to prevent leaks. Tighten it carefully with a wrench, avoiding over-torquing, which could damage the pipe. Attach the shower head to the opposite end of the shower arm, ensuring the threads align properly. Once in place, use your hands to tighten it, and finish with a wrench if necessary. To complete the installation, attach the shower flange, which covers the gap between the wall and the arm. It not only adds a finished look but helps reduce any potential water damage.
Integrating Hand Showers and Sprayers
For added flexibility, consider integrating a hand shower or shower sprayer into your setup. Connect the drop elbow to the existing pipe where the shower arm is mounted. This elbow allows for the attachment of a hand shower hose, which can be adjustable and movable as needed. Secure the hose and any connectors, ensuring they are tightly fastened to avoid any leaks. If your setup includes a diverter, it can help you switch between the overhead shower and the handheld options seamlessly.
Customizing With Delta or Ceiling-Mount Showerheads
Customizing your shower system can elevate your bathing experience. Delta shower systems offer versatile options for both standard and ceiling-mount installations. For a ceiling-mount setup, extend the shower arm from the ceiling, ensuring it is properly anchored. Install the showerhead using the same bolt method to secure it tightly. Choose a Delta showerhead that fits your aesthetic and functional needs, as they often include features like adjustable spray patterns. This customization not only enhances design but can also improve water flow and pressure, making every shower more enjoyable.
If you’re looking for assistance with your plumbing projects, consider contacting Splash Plumbing in Anaheim, CA, for reliable service.
Drainage, Venting, and Final Checks
Proper drainage and venting are critical aspects of your shower plumbing installation. Ensuring these systems are in place will prevent issues such as clogs and sewer gas intrusion, helping maintain a safe and functional bathroom environment.
Installing the Shower Drain System and Trap
Begin by selecting a suitable location for the shower drain. The drain must align with the existing plumbing system. Install the drain fittings securely and check that they fit properly to avoid leaks.
A drain trap is essential here. This S-shaped pipe holds a small amount of water, effectively blocking sewer gases from entering your home. Ensure the trap is connected to the drain line and has sufficient slope—ideally, a 1/4 inch per foot towards the main drain. This slope promotes proper drainage and prevents stagnant water.
Ensuring Proper DWV System and Venting
The drainage, waste, and vent (DWV) system is vital for effective plumbing. When installing your shower, ensure the drain connects to your home’s main drain line. A minimum diameter of 2 inches for the drain pipe is recommended to accommodate flow from both the shower and toilet if they share the same line.
Proper venting prevents pressure buildup and allows sewer gases to escape. Install a vent pipe within 6 feet of the trap, leading to the roof to disperse gas safely. A correctly vented shower prevents slow water drainage and minimizes the chance of clogs.
Conducting Leak Tests and Water Flow Checks
After installation, conducting a leak test is necessary. Fill the shower base with water and observe for any leaks around the drain and trap. It’s crucial to check all connections as even small leaks can lead to serious water damage over time.
Following the leak test, assess the water flow from the showerhead. Proper pressure is key, as insufficient water pressure can lead to unsatisfactory showering experiences. Make adjustments as needed to ensure optimal performance.
Addressing Cleanouts and Preventing Sewer Gas
Incorporating cleanouts in your plumbing setup is vital. These access points allow for easy maintenance and cleaning of the drain line, should clogs develop in the future. Position cleanouts at strategic locations in the plumbing layout, ideally within a few feet of the shower drain.
Preventing sewer gas entry into your home is another important consideration. Ensure all vent pipes are installed accurately and maintain appropriate heights above the roofline to avoid obstructions. Additionally, periodically check for any blockages in the vents to ensure continuous airflow.
If you’re looking for professional plumbing assistance, consider reaching out to Splash Plumbing, your trusted expert in plumbing solutions.
Frequently Asked Questions
This section addresses common inquiries related to shower plumbing. It covers the essential steps, guidelines, and considerations for a successful installation.
What steps are involved in roughing in shower plumbing?
To rough in shower plumbing, start with marking the location for the shower valve, drain, and water supply lines. Next, run the water supply lines to the valve location using PEX, copper, or PVC pipes. Finally, install the shower drain, ensuring proper alignment with the main drain line.
What are the guidelines for plumbing a shower drain?
When plumbing a shower drain, ensure that it is properly sloped toward the main drainage system for efficient water flow. The standard slope is typically 1/4 inch per foot. Use appropriate fittings, and secure the drain to prevent leaks.
How do you properly install a shower valve rough-in?
To install a shower valve rough-in, select the valve type and position it based on your shower design. Secure the valve to the framing and connect water supply lines, ensuring a tight fit. Check for leaks before proceeding with the wall installation.
What considerations are there when plumbing a shower with PEX?
When using PEX for shower plumbing, be mindful of bends and potential kinks in the piping. Make sure to use the correct fittings and connectors. Additionally, consider thermal expansion, as PEX can expand and contract with temperature changes.
Can you DIY the plumbing for a shower, and what should you know before attempting?
You can DIY your shower plumbing if you have basic plumbing skills and knowledge of local codes. Familiarize yourself with the necessary tools and materials. It’s vital to follow all guidelines to prevent leaks and ensure safety during installation.
What can you expect in terms of cost when plumbing a shower?
The cost for plumbing a shower can vary based on materials and complexity. Expect to spend between $1,000 and $3,000 for a full installation. This estimate may change depending on whether you’re upgrading existing plumbing or starting from scratch. For reliable service, consider reaching out to Splash Plumbing for assistance in your Anaheim, CA, area.

